03. VRAM buffer

I wrote some support functions for filling a VRAM update buffer. This is an automatic system where you write changes to the screen in a buffer. The system then copies these changes to the PPU during the v-blank period. It runs smoothly without ever having to turn the screen off.

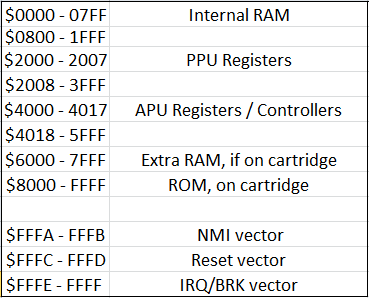
I’m using some behind the scenes code, and I’ve defined a VRAM_BUF in crt0.s to be at $700. Notice, that this technically shares the 700-7ff space with the C stack. They could potentially collide. If you are worried about this, put the VRAM buffer at 600-6ff. But, you shouldn’t be putting more than 74 bytes of writes to the VRAM buffer, so this should never get bigger than 77 bytes. The C stack grows down from 7ff. And, the C stack only needs a dozen or so bytes, if you program like I do, and don’t use local variables, and only pass a few at a time to a function, and don’t use recursion. If you do those things, you’ll be fine. But, I thought I should let you know.

To use my system, you need to point some internal pointer to my system. This requires no passed value, that address is defined by VRAM_BUF in crt0.s .

set_vram_buffer()

This is kind of like set_vram_update(). To point the PPU update to another data set, you would do it with set_vram_update(&data), and to turn it off you can do set_vram_update(NULL). Generally, you only need to set_vram_buffer() once, at the top of the main() function, and never turn it off.

.

You can buffer a single tile with

one_vram_buffer(tile #, ppu_address)

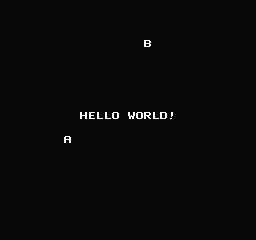
You just need the tile number and an address. NTADR_A(x,y) is a macro that can get us the nametable address from a tile position. X and Y are tile positions – X from 0 to 31, Y from 0 to 29. There are also NTADR_B, NTADR_C, NTADR_D macros, one for each of the 4 possible nametables.

You could also use a function I wrote that calculates the address at run time, using pixel values 0-255 X, 0-239 Y. NT is which nametable, 0-3.

get_ppu_addr(char nt, char x, char y);

.

If you want to send more than 1 byte to the PPU, use

multi_vram_buffer_horz(const char * data, unsigned char len, int ppu_address);

or

multi_vram_buffer_vert(const char * data, unsigned char len, int ppu_address);

Horz goes left to right. Vert goes top to bottom.

.

So the address and data and an eof are copied to the vram buffer. One of the pluses here is that the eof is auto adjusted as you keep writing to the buffer.

One warning, though. It doesn’t keep track of how big you make the buffer, and if you aren’t careful, you could put too much in, and bad things might happen. (garbled graphics, misaligned screens, or crashed games.)

I wrote multiple variations of how you could write to the screen, and this all is transferred in 1 v-blank. This is pretty much the maximum number of changes you can do in one frame. That’s around 40-50 tiles worth of data transferred. If it’s one contiguous write, maybe 70 tiles. (On a PAL NES, you could do more, as the v-blank period is longer).

03_hello3

https://github.com/nesdoug/03_Hello3/blob/master/hello3.c

https://github.com/nesdoug/03_Hello3

02. What’s a v-blank?

Writing to the screen while the picture is on.

If you used the vram_adr() or vram_put() functions while the screen is ON, there is 92% chance that you will write garbage on the screen and misalign the scroll.

Why this happens, basically, the PPU can only do 1 thing at a time, and while the screen is running, it is busy reading data from the VRAM and sending it to output to your TV, 92% of the time.

It goes line by line, pixel by pixel, calculating which color to write for each dot. Here’s a nice slow motion camera watching SMB1 (at about 2:14).

Once it reaches the bottom, it waits a short period. That’s called the vertical blank period (v-blank). This is the only time the PPU is not busy, and we can safely write tiles to the screen during this time (not too many).

Also, we have turned NMI interrupts on (this bit in register 2000, 1xxx xxxx, somewhere in the startup code in crt0.s.). At the beginning of v-blank, the PPU generates a signal (NMI) which halts CPU execution, and it jumps to the nmi code in neslib.s, and executes that during the v-blank period.

We know that it will go to the nmi code (asm, in neslib.s) during this period, so we know that it is safe to write to the PPU during this time (well, a few bytes). We can use this to our advantage, because if we are playing a game, and you turn the screen off, write to the screen, then turn it back on…the screen will flicker black during that time, which is a bit annoying. So, we want to keep the screen on, and we want to write to the PPU during v-blank.

So, while the PPU is busy drawing the screen, we will write to a buffer. Then when we call ppu_wait_nmi() it will set a flag that says “our data is ready to transfer” and it will sit and wait until v-blank. The nmi code will transfer it to the PPU automatically.

Before all that, you need to set_vram_update(address of data), to pass the address of our data or buffer to the neslib.

I have made some examples of data that the automated system can read. You can either send it 1 byte, or a contiguous set of data (tiles).

SINGLE BYTE
address high byte
address low byte
data (tile #)
EOF

MSB(NTADR_A(18,5)),
LSB(NTADR_A(18,5)),
‘B’,
NT_UPD_EOF

.

CONTIGUOUS DATA
address high byte + update horizontal
address low byte
# of bytes
data
EOF

MSB(NTADR_A(10,14))|NT_UPD_HORZ,
LSB(NTADR_A(10,14)),
12, // length of write
‘H’,
‘E’,
‘L’,
‘L’,
‘O’,
‘ ‘,
‘W’,
‘O’,
‘R’,
‘L’,
‘D’,
‘!’,
NT_UPD_EOF

Note (optional) to update vertically, replace NT_UPD_HORZ with NT_UPD_VERT, it will draw top to bottom instead of left to right. Left to right wraps to the next line. Top to bottom does not wrap, and you probably don’t want to go past the bottom tile of a screen.

You can stack multiple writes into one frame, if you strip the EOF between them. See hello2.c below. An empty buffer would be just the EOF (= 0xff). The system needs to see a 0xff or it will keep pushing tiles infinitely.

There is a limit as to how many bytes you can buffer…

About 31 single bytes, or 74 contiguous bytes, or mixed, somewhere in between. But this is fuzzy, you should err on less than this. If you never adjust the palette, you can get more (maybe 40 single, 97 contiguous) safely per frame.

Note, the same bytes will transfer to the PPU over and over, every frame, until the buffer changes. The user won’t see it, but it’s a waste of CPU time.

You can turn it off with
set_vram_update (NULL)

.

02_hello2

https://github.com/nesdoug/02_Hello2/blob/master/hello2.c

https://github.com/nesdoug/02_Hello2

.

I’ve noticed that nearly nobody is using this function, nor a VRAM buffer. Most people are using vram_put() or something similar.

I think it’s because it’s awkward to construct a VRAM update on the fly. So, I wrote a whole support library to make this a piece of cake.

Next time…

01. Our first program

The most basic thing you can do is writing to the bg while the screen is off.

ppu_off();
vram_adr(address);
vram_put(tile);
ppu_on_all();

Let’s go over these functions.

ppu_off(); to turn the screen off (which resets the bits xxx1 1xxx of the PPU mask register 2001 to zero.) This frees the PPU to do whatever you want.

Then, set an address to set the start position for writing.

vram_adr(NTADR_A(x,y));

This pushes 2 bytes to ppu address register 2006, first the high byte and then the low byte. It sets a location on the screen for writing.

We want to write to the #0 nametable, which is between $2000 and $23ff in the PPUs RAM. Nametable just means tilemap, or background screen.

This little macro will generate a correct address at compile time.

#define NTADR_A(x,y) (NAMETABLE_A|(((y)<<5)|(x)))

X and Y are tile positions. X from 0 to 31, Y from 0 to 29.

Then we can start sending data to the PPU DATA register $2007, 1 byte at a time.

The most obvious way to do that is with vram_put(tile) function. Just loop until all the data has been sent. If you want to fill a large area of the screen with the same tile, you could use vram_fill(tile, length).

The NES PPU will automatically increment the PPU address as each data byte is sent. So, each byte of data will go in 1 to the right of the last one, wrapping around to the next line.

Then turn the screen on (which flips the xxx1 1xxx bits ON in register 2001).

ppu_on_all();

What we are doing is putting values on a tile map, which tells the NES which tiles to draw on the screen. Like arranging puzzle pieces on a grid. I made the tileset to look like letters. I positioned them the same as ASCII map does, so I can call them like ‘A’ or “ABC” and it matches the graphics.

Open the Alpha.chr file in YY-CHR to view it. Each tile is 8×8 pixels.

01_YY

At the end of crt0.s I included the Alpha.chr file and put in a “CHR” segment, which the linker is directed to put at the end of the file. Our linker configuration is nrom_32k_vert.cfg, which makes sure that the file is organized in a way that emulators will know how to run it.

01_hello

See hello.c for our code.

https://github.com/nesdoug/01_Hello/blob/master/hello.c

.

https://github.com/nesdoug/01_Hello

Download the source code inside the cc65 main folder. compile.bat sets a relative path to cc65 home that is up one directory. set CC65_HOME=..\

So it should look like /cc65/01_Hello/

Or, you could change the path to cc65 home, if you want to put your dev code elsewhere.

.

On a sidenote. When I was first starting programming NES games in ASM, I tried to write to the screen, and was confused because what I wrote would only show up in the upper left of the screen. Due to the strange way the PPU works, writing an address (2006) overwrites the scroll registers (2005). After writing to the screen, it is important to write to 2000 once and 2005 twice (or 2006 twice and 2005 twice) to realign the screen.

In many commercial games you will see this after a write to the PPU…

lda #0
sta $2006
sta $2006
sta $2005
sta $2005

neslib does this automatically in the background.  If you look near the bottom of the nmi code in neslib.s, you see it does exactly what I described, just before the screen comes back on.

lda #0
sta PPU_ADDR ;2006
sta PPU_ADDR ;2006

lda <SCROLL_X
sta PPU_SCROLL ;2005
lda <SCROLL_Y
sta PPU_SCROLL ;2005

lda <PPU_CTRL_VAR
sta PPU_CTRL ;2000

The 2000 write sets the proper nametable.

How cc65 works

cc65 is command line program. You will write your code in a text editor, and save it. Then you would open a command prompt (terminal) and compile the program by tying in a series of instructions. There are 3 apps we are interested in — cc65 (the compiler), ca65 (the assembler), and ld65 (the linker). I wrote a batch file (compile.bat) to automate the process. (I later added a makefile, which does the same thing… for Linux users).

You should have downloaded cc65 from here

http://cc65.github.io/cc65/

First, you will write your source code in C (with a text editor). cc65 will compile it into 6502 assembly code. Then ca65 will assemble it into an object file. Then ld65 will link your object files (using a configuration file .cfg) into a completed .nes file. All these steps will be written in the batch file, so in the end, you will be double clicking on a .bat file to do all these steps for you. Here is an example.

@echo off
set name="hello"
set path=%path%;..\bin\
set CC65_HOME=..\

cc65 -Oirs %name%.c --add-source
ca65 crt0.s
ca65 %name%.s -g
ld65 -C nrom_32k_vert.cfg -o %name%.nes crt0.o %name%.o nes.lib -Ln labels.txt

del *.o
move /Y labels.txt BUILD\ 
move /Y %name%.s BUILD\ 
move /Y %name%.nes BUILD\
pause
BUILD\%name%.nes

Quick explanation…you would edit the name=”” to match your .c filename. Anywhere there is a %name% it will replace it with the actual filename. Then, it runs the cc65 (compiler) and ca65 (assembler) and ld65 (linker) programs. Then, it deletes object files and moves the output into a BUILD folder. The last line tries to run the final .nes file.

I tried to make this as pain free as possible, so I “#include” all the C source files into one .c file and “.include” or “.incbin” all assembly source files in crt0.s. The only thing you need to change in the .bat file is the “name” of the main .c file (if it changes).

More about cc65…

The 6502 processor that runs the NES is an 8 bit system. It doesn’t have an easy way to access variables larger than 8 bit, so it is preferred to use ‘unsigned char’ for most variables. Addresses are 16 bit, but nearly everything else is processed 8 bit. And, the only math it knows is adding, subtraction, and bit shifting for some multiplication/division (x 2 is the same as << 1).

You may have to write your C code a bit differently, to get it to run smoothly.

1. Most variables should be defined as unsigned char (8 bit, assumed to have a value 0-255).
2. Everything is global (or static local)
3. I also try to avoid/reduce the number of values passed to a function*

*return values are ok, they are passed via registers

The main slowdown for C code is moving things back and forth from the C stack. Local variables and passed variables use the C stack, which can be up to 5x slower than a global variable. The alternative to a function argument is to store the values to temporary global variables, just before the function call. This is the kind of thing that could easily cause bugs, so be very careful.

4. use ++g instead of g++

cc65 doesn’t optimize very well. It uses “inc g” for ++g, but always uses “lda g, clc, adc #1, sta g” for the post-increment (4x longer). So if you want to do this…
z = g++;

you should instead do…
z = g;
++g;

5. don’t use anything that requires a heap. malloc() and free(), etc.

Here’s some more suggestions for cc65 coding…

http://www.cc65.org/doc/coding.html

.

Or… you can just write the code the way you are used to, and worry about optimization if things start to run too slowly.

.

I’m using a slightly different version of neslib that Shiru originally wrote. There are many different version floating around. Such as this fork…

https://github.com/clbr/neslib

and you could cut and paste some of the alternate functions (both .c and .s / .sinc code) into the version used on my code, if you want to use them.

.

I have been putting each project folder directly inside the main cc65 folder. The relative path in the batch file will go up one folder to look for the bin folder holding all the .exe files. If you have problems, you can change the path to the bin folder from relative to an absolute path in the compile.bat file… or perhaps you can put the cc65/bin folder in “environmental variables” so that your system always knows where the cc65 program is.

What you need

This is what you will need to program an NES game…

1. A 6502 compiler
2. A tile editor
3. A text editor
4. A tile arranging program
5. A good NES emulator
6
. a music tracker
7. a test cartridge

.

6502 Compiler

For my examples I will exclusively work with cc65.

http://cc65.github.io/cc65/

(Click on Windows snapshot)

.

I am using the neslib library (by Shiru), and my own support library. You can get both from any of my NES examples.

https://github.com/nesdoug/01_Hello/tree/master/LIB

.

Tile Editor

You need a tile editor to create the graphics. I personally prefer YY-CHR. You can get it here…(this is the updated and improved version).

https://w.atwiki.jp/yychr/sp/

Here’s a link to the old version, in case you are interested.

https://www.romhacking.net/utilities/119/

.

I prefer to work first in GIMP (similar to Photoshop), convert to indexed (4 color), then copy/paste over to YY-CHR later. You should be working in the 2bpp NES format (the default), when you use YY-CHR.

Here is a link where you can download GIMP.

https://www.gimp.org/downloads/

.

Text Editor

You can use any kind of text editor to write your code. I’ve been using Notepad++ myself.

https://notepad-plus-plus.org/download/

NotepadPP2

I’ve heard that people are using VSCode to write their C code. You might prefer that.

.

Tile Arranger

To make background maps, I recommend, NES Screen Tool. It shows the NES color limitations very well, and is good for making single screen games. It also gives you nametable addresses and attribute table addresses, which comes in handy. I think I used 2.51, and if you have an older version, it won’t open the .nss files in my source code. Get it here…

https://shiru.untergrund.net/software.shtml

NESST isn’t being updated. But there is  a new version by FrankenGraphics that has lots of new features. You could use this instead.

https://frankengraphics.itch.io/nexxt

.

And, if you are making a scrolling game, I would also pick up Tiled Map Editor. I will go into more detail later, but you can make a data array out of the exported .csv files from Tiled.

http://www.mapeditor.org/

.

NES Emulator

And, next is an NES emulator. I used to use FCEUX. It has some nice debugging tools. A newer emulator, MESEN, has become popular, so you should get that too.

FCEUX is here…

http://www.fceux.com/web/download.html

Mesen is here…

https://www.mesen.ca/#Downloads

You may have to change the video display to display every pixel. I’ve seen people say “the NES is 256×224 pixels”, but that is not true. Older TVs tended to cut off a few pixels from the top/bottom of the picture, but the NES generates a full 240 pixels high. One of my TVs displays nearly the entire 240 pixels. You should assume that some users will see the entire picture, so in FCEUX go to Config/Video/Drawing Area, and set the output to the full 0 to 239.

.

Music Tracker

I don’t want to go into too much detail yet, but you will also need to get Famitracker for making music and/or sound effects for your game.

http://famitracker.com/downloads.php

(update, the original link no longer works, here is a backup)

https://web.archive.org/web/20230318222410/http://famitracker.com/downloads.php

.

I use the famitone2 music code (by Shiru), which works well with neslib library, and is much smaller/faster than the famitracker driver. But you still need to write the songs in famitracker.

https://shiru.untergrund.net/code.shtml

.

I made my own forks of famitone, to add more features and effects. Version 3 adds volume column and all notes. Version 5 has several of the pitch effects working (vibrato, portamento, etc).

https://github.com/nesdoug/famitone3.3

https://github.com/nesdoug/famitone5.0

.

Test cartridge

Playing the game in an emulator is nice, but the real test is playing on a real NES with a flash cartridge.

I have a PowerPak, but if I were buying one today, I would probably get a N8 Everdrive from krikzz (directly or from their Amazon page or from StoneAgeGamer). The PowerPak uses a compact flash card, and the N8 uses an SD card.

For the PowerPak, I needed to buy a special attachment to connect a compact flash drive to my computer, but most computers have SD card slots.

.

Python

OPTIONAL… I have been writing simple python 3 scripts to process some of the data into C arrays. You don’t need to, but it might be helpful if you installed python 3, to use my tutorial files. I just use simple scripts for “automating the boring stuff”.

https://www.python.org/downloads/

.

Next Time…

cc65 – in more detail.

Introduction

Selfie4

Hello all. I’m Doug (@nesdoug2, dougeff). Welcome to my tutorial – How to program an NES game in C. You can make an original Nintendo game that plays on a real NES console (or emulator).

The original NES games were written in Assembly / ASM. If you prefer that route, then you could start with the Nerdy Nights tutorial like I did.

http://nerdy-nights.nes.science/

But, I think C is easier. You could develop a game in half the time in C.

Another option, you could use NESmaker ($36), which has all the code for a game written, and all you need to do is design the graphics and the levels.

.

Let’s talk about the NES.

Released in Japan (Famicom), 1983, released in US, 1985.

CPU, Ricoh 2A03, 1.79 MHz, is a 6502 clone (missing decimal mode) with audio circuitry. 6502 was a very popular chip at the time. It is the same chip that Apple II and Atari 2600 used.

Screen resolution = 256×240 pixels

1 background layer, scrollable

Colors available = 56

64 sprites (8×8 or 8×16), freely moving graphic objects

5 channels of audio. 2 square, 1 triangle, 1 noise, and 1 for small samples

Here’s the memory map for the CPU.

nes_map2

That’s only 2048 bytes of RAM standard. Not a lot to work with.

.

The PPU (produces a video image) is a separate chip, that has its own memory. It is only accessible from the CPU through a slow 1 byte at a time transfer, using hardware registers.

Here’s the memory map for the PPU

NES_PPU_MAP

Each tileset holds 256 tiles. Each tile is 8×8 pixels.

Nametable is a technical word that basically means tilemap, or background screen.

There is also another RAM chip dedicated to Sprites (called OAM). It holds 256 bytes.

It may look like there are 4 usable nametables (background screens), but actually there is only enough internal VRAM for 2 screens. The cartridges are hardwired to either be in “horizontal mirroring” or “vertical mirroring”. More advanced cartridges can switch between these options.

Vertical mirroring (or horizontal arrangement) is for sideways scrolling games, and the lower 2 nametables are just a mirror of the upper 2 nametables, like this…

Mario

Horizontal mirroring (or vertical arrangement) is for vertically scrolling games, and the right 2 nametables are just a mirror or the left 2 nametables, like this…

KidI

A few games had extra RAM on the cartridge to actually have 4 different nametables (Gauntlet is one example). For more detailed information, check out the nesdev wiki.

https://www.nesdev.org/wiki/Nesdev_Wiki

Lastly, the game cartridges usually have 2 ROM chips inside. One PRG-ROM (executable code), and one CHR-ROM (graphic tiles). But some games, instead of a CHR-ROM chip, have a CHR-RAM chip. The graphics are located somewhere in the PRG-ROM, and the program has to transfer the bytes from there to the CHR-RAM chip.

My tutorials will exclusively deal with CHR-ROM style games. It’s easier. With this style, the graphic tiles are automatically connected to the PPU and you don’t have to transfer them to the PPU. With the simplest cartridge (NROM-256) you get 2 sets of 256 tiles (each tile = 8×8 pixels). Usually, one for background tiles and one for sprite tiles.

.

You might want to read up on hexadecimal numbers. 8 bit numbers are much easier to read and understand in hex. I usually use $ to indicate hex, but sometimes I use 0x. $ is used in assembly languages, and 0x is used in C like languages. You don’t need to be a math expert, but it will help if you know what I’m talking about.

.