Monroeville Park East
Updated April 2026. They just put in concrete pads. The only major change is to hole 6. They appear to be putting in a 3rd pin placement (for everything but 10), but by April those haven’t been placed yet.
THIS PAGE IS OLD INFORMATION. HERE IS A LINK TO THE NEW UPDATES…
I was bored and made up some maps of each hole. Oh, and here’s a printable map of the whole coarse.
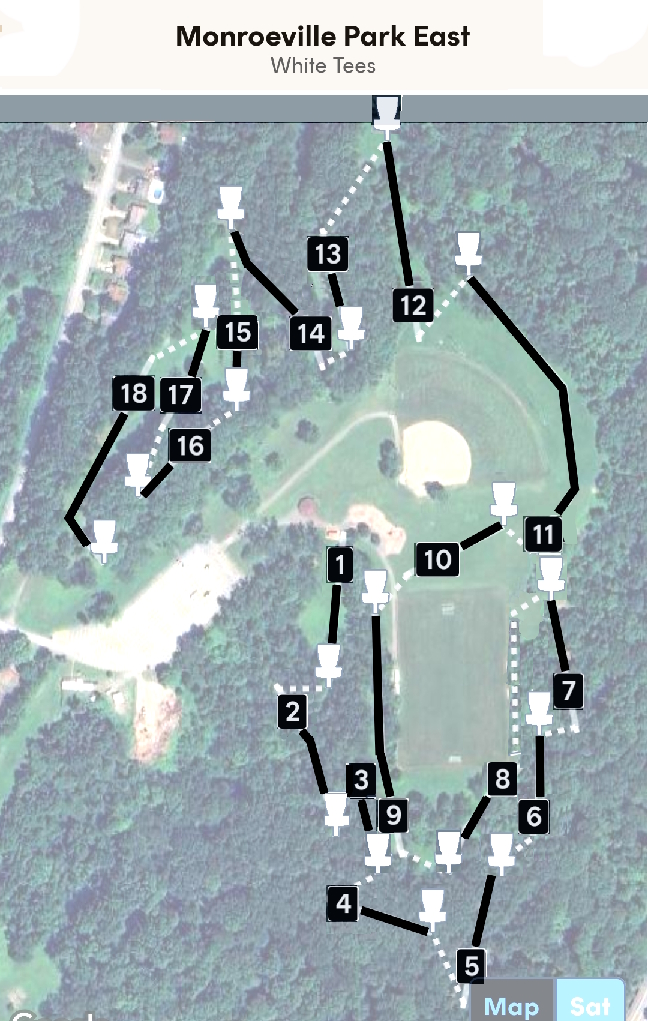
Monroeville DGC is a mixture of wooded and open holes. It’s very hilly. The only water is a creek that runs from the right of hole #1, crosses in front of the white tees on #2, and then goes along the far right side of #2 fairway. There is one bathroom by the #1 tees (not open during the winter).
Note that on each basket is little plastic tabs which show the direction to the next tee.
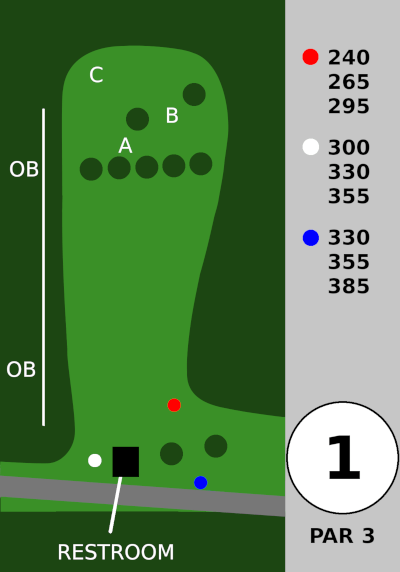
Hole 1 – is a steep downhill, sloping left to right. There is OB left, but the real danger is the rough on the right. There’s usually a left to right headwind that likes to toss discs deep into the ravine to the right.
.
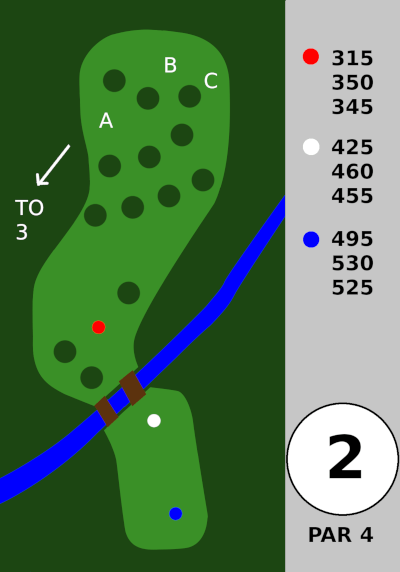
Hole 2 – They just put in a big walkway over the creek to get to the white tee. You have to climb up a ways to get to the blue tee box. From the red tee it’s an uphill shot.
Backtrack a bit to get to the #3 tee.
.
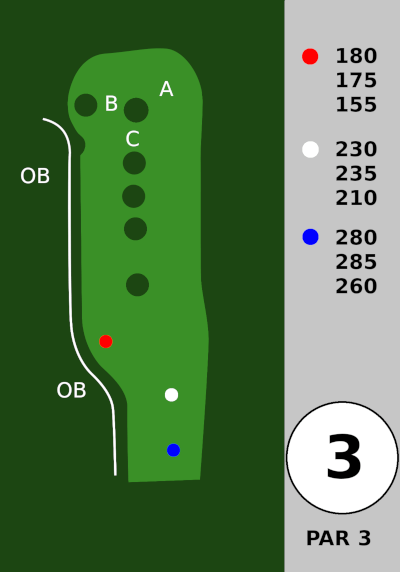
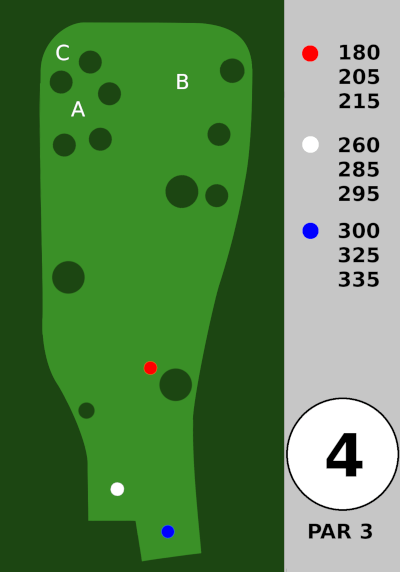
Hole 3 – is short and straight. OB left. There’s a little path near the A basket down to hole 4, and you do NOT want your disc to roll down that path. I did it once, and it rolled over a 100 ft.
.
Hole 4 – is a steep uphill. You might not be able to see the pin from the tee.
.
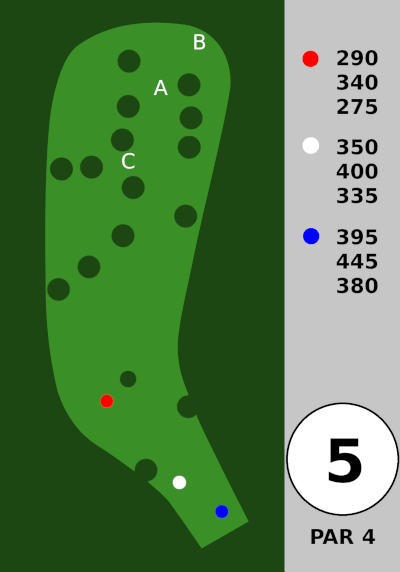
Hole 5 – is a steep uphill. I think you’re better off landing on the right side of the fairway. They moved the long pin (B) further to the right to accommodate the new hole 6 tee pads.
.
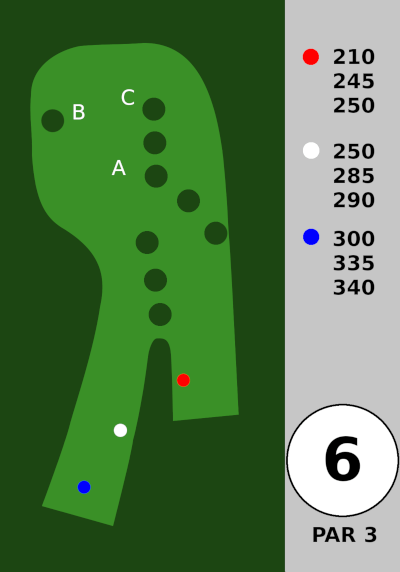
Hole 6 – Slightly uphill, curving left. They just moved the white and blue tees. You might not be able to see the basket from the white or blue tees, but you definitely want the disc to hook left and not go too far right.
.
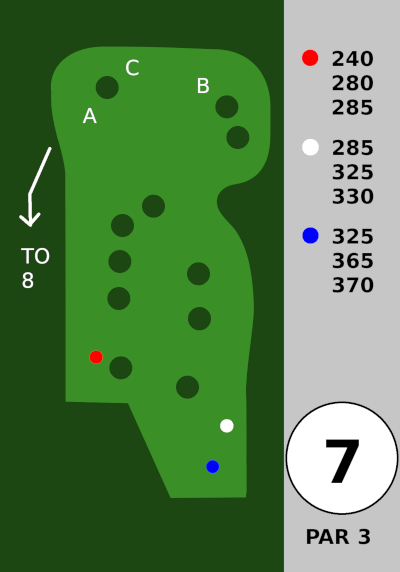
Hole 7 – Red tee is a tunnel shot to an open area. White and blue tees you either forehand through the middle of the fairway or backhand down the far right. Regardless, the far right side is to be avoided.
Backtrack a long way along the soccer field to get to the #8 tee.
.
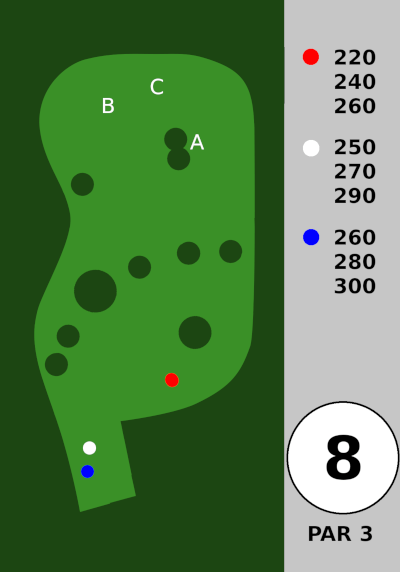
Hole 8 – has a lot of trees. There’s usually a headwind. Aim for a low ceiling shot between the trees, or (from the white / blue tees) you could potentially go OVER all the trees.
.
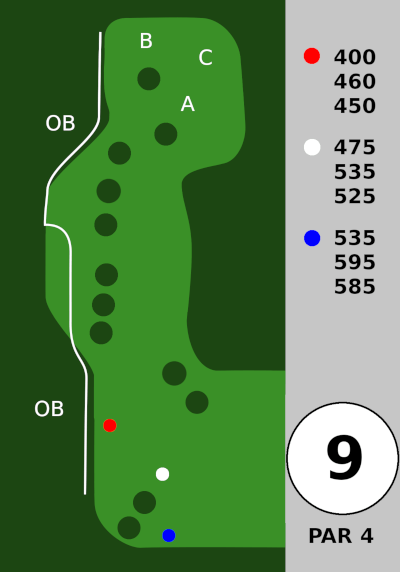
Hole 9 – is a long, narrow, side-sloped (right to left) fairway with OB left. Tee shot, just doesn’t fade hard left. 2nd shot is a bit uphill and the baskets are on top of a hill. The OB line is very close to basket B, making it much harder than A. This hole is probably the hardest to birdie.
.
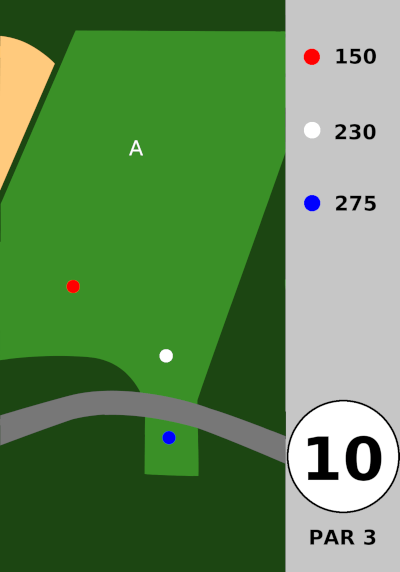
Hole 10 – Next to the baseball field. No trees. This seems like it should be very easy, but due to the elevated basket and the wind, it is not.
.
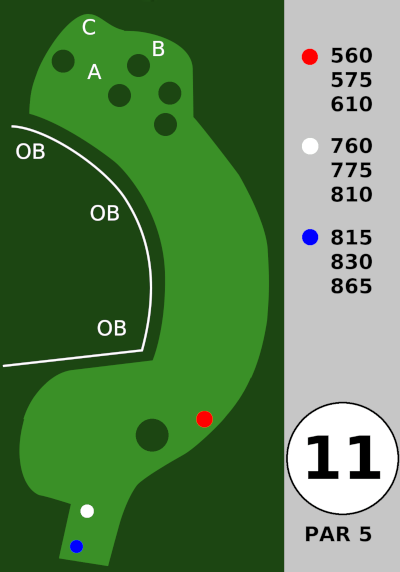
Hole 11 – The baseball field is OB, but you are allowed to throw over the field, as long as you don’t land on it. Once you get in front of the red tees, you need to curve left. The fairway is hard to see. Here are some pictures.

From the white tees it’s 200 ft to clear the tree on the right and 240 ft to the hill. The arrow here will get you to the center of the fairway. You could also land on the hill, by the fence.
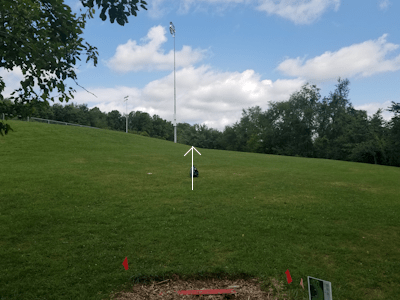
From the red tees, aim just to the right of this light pole.
.
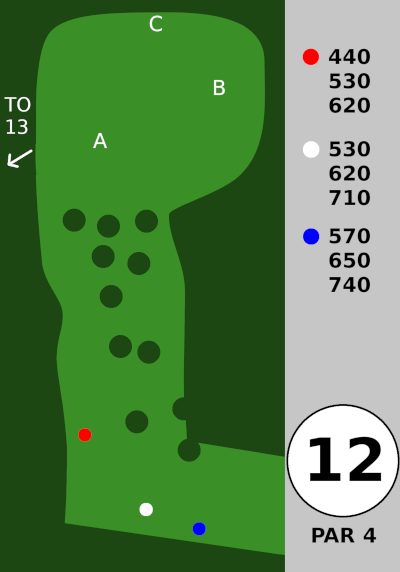
Hole 12 – The first half is thick with trees. The left path is wider and easier. The right path is doable, just don’t sail too far right or you’ll never find your disc. Over the top gets riskier every year as the pine trees get taller… I don’t recommend that play anymore.
From the end of the trees, it’s 120 ft to the A basket and about 200 ft to the B basket (and maybe longer from the far left side).
.
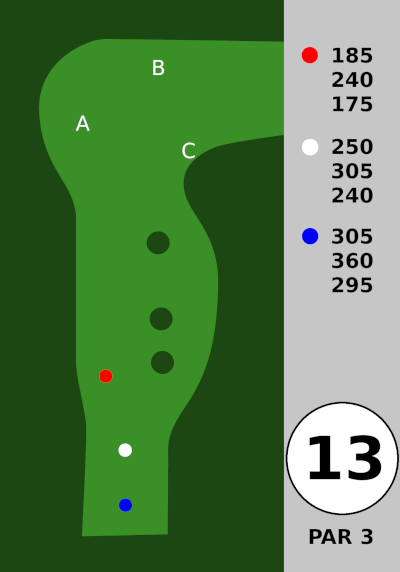
Hole 13 – is a straight par 3. Don’t go too far left, or there is a steep downhill (very easy to lose your disc). Don’t try to climb down, just walk all the way around back to 12 fairway to get it. It has very elevated baskets which makes birdies more difficult, but the surrounding trees help block the wind.
.
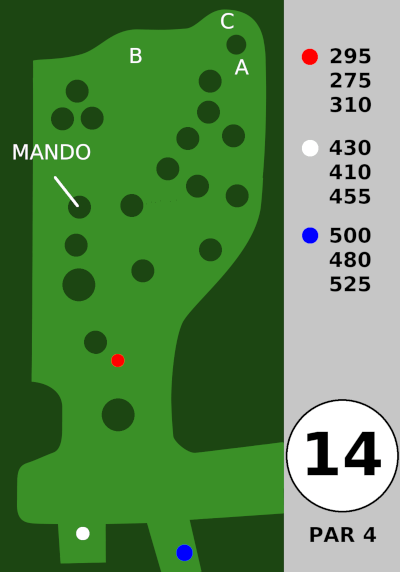
Hole 14 – is a steep uphill. Mando tree on the left. There is a little open fairway just passed the mando tree. The blue tees are way back down a path by a small building (headed back to the ball field).

This is the view from the WHITE tee at 14. I usually take the right gap with a high hyzer off the tee.
.
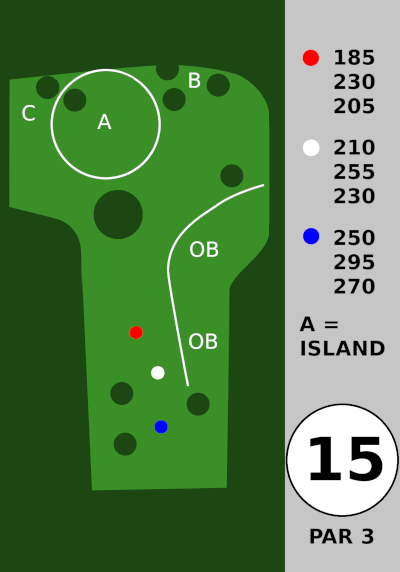
Hole 15 – is downhill, while avoiding that one huge tree. If the basket is inside the white circle, play as an island, and everything outside is OB. I believe there is a drop zone marked with a pink flag.
If the basket is at B or C, only the 17th fairway to the right is OB. Caution, going too far long is bad. It’s a really steep drop off back there.
.
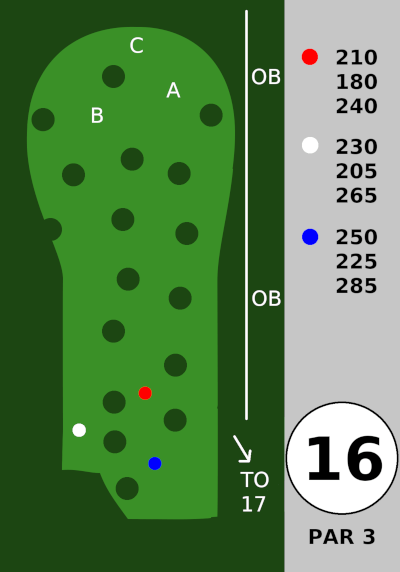
Hole 16 – is a par 3 with a ton of narrow gaps between the trees. OB to the right, and steep downhill to the left. The slope and the bare ground cause discs to skip far left, so aim for a landing spot a bit to the right of the basket.
Backtrack to the right to get to the next tee.
.

Hole 17 – is a steep uphill, with OB along the right. This plays much longer than the numbers say.
.
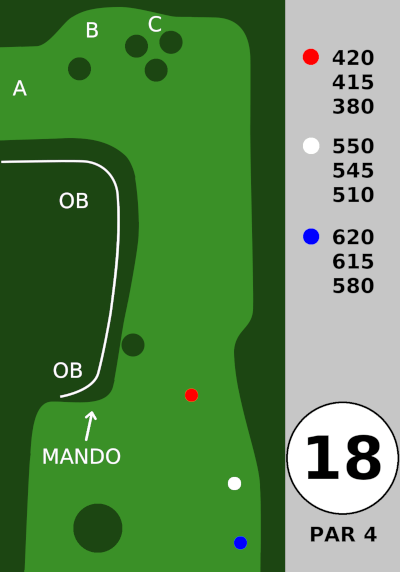
Hole 18 – is one of the hardest holes, and OB left is very easy to find. There is a mando tree, way on the left, but I can’t imagine how you could miss it. From the tee, just try to land in the fairway. Then, you need an overstable disc to curve hard left and down towards the basket. It’s very downhill by the baskets. Rollaways near basket A frequently go all the way down to the parking lot, so maybe try to go long/wide on that 2nd shot and get stuck in the rough near basket B to avoid deadly rollaways.
.
I will need to remeasure once they put in the C pins.
