Monroeville Park East
(updated Oct 2025)
I was bored and made up some maps of each hole. The blue tees are new, and I wanted to make some simple maps to help find them, but I overdid it and made them into full maps of all the tees and all the baskets. I took my own measurements for distances, and that’s why they are different from those on Udisc.
Monroeville DGC is a mixture of wooded and open holes. It’s very hilly. The only water is a creek that runs from the right of hole #1, crosses in front of the white tees on #2, and then goes along the far right side of #2 fairway. The tees are marked by a painted plank of wood and some flags (and a pile of mulch). There is one bathroom by the #1 tees.
Note that on each basket is little plastic tabs which show the direction to the next tee.

Hole 1 – is a steep downhill, sloping left to right. There is OB left, but the real danger is the rough on the right. There’s usually a left to right headwind that likes to toss discs deep into the ravine to the right. Go up in stability and aim a bit low.
.

Hole 2 – To get to the white and blue tees, you need to find a hidden bridge (to the right from the #1 baskets). You have to climb up a ways to get to the blue tee box. From the red tee it’s an uphill shot, so use an understable disc from there to the basket. Be cautious (if basket B) not to throw too far past the basket, because it’s a steep downhill behind there. Discs tend to glide way past the B basket, if the wind catches it.
Backtrack a bit to get to the #3 tee.
.

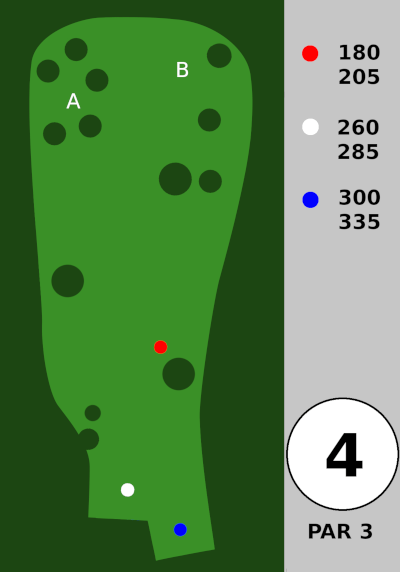
Hole 3 – is short and straight. OB left. Neutral putter shot. There’s a little path near the A basket down to hole 4, and you do NOT want your disc to roll down that path. I did it once, and it rolled over a 100 ft.
.
Hole 4 – is a steep uphill. Use an understable disc. Try to avoid going off the fairway to the right (it is downhill that direction)
.
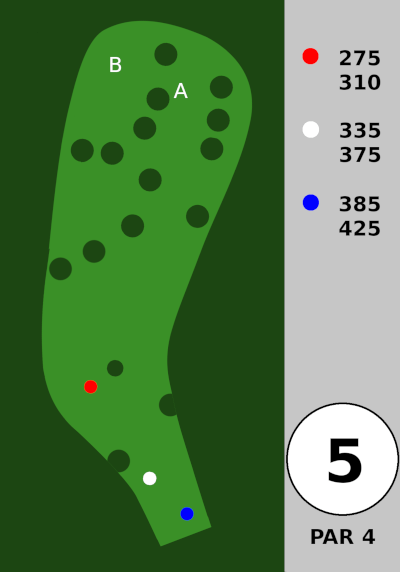
Hole 5 – is a steep uphill. Use an understable disc. I think you’re better off landing on the right side of the fairway. It gives you a better angle to the basket. If you shank it too far to the right, you’re going to have a difficult scramble.
.
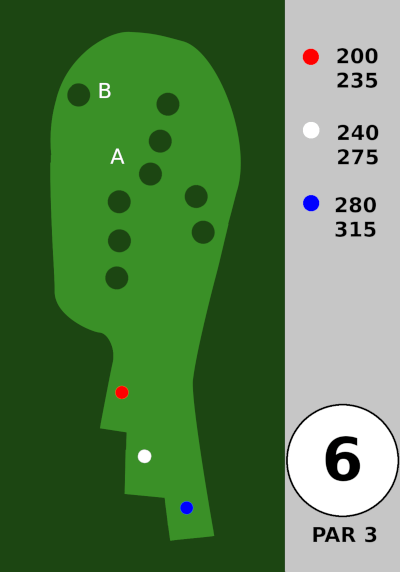
Hole 6 – Slightly uphill, slightly curving left. You’re fine if you land on the far left side. Try not to throw off the fairway to the right (it goes downhill over there). They moved the blue tee (2025) to just behind the white tee, and it’s a lot steeper uphill now.
.

Hole 7 – Red tee is a tunnel shot to an open area. White and blue tees, you need to avoid all those trees and low ceiling limbs. There used to be very tall grass along the right side in front of the white tee. I think they are going to keep it short, but it used to be difficult to find a lost disc along the right side. Regardless, the far right side is to be avoided.
Backtrack a long way along the soccer field to get to the #8 tee.
.

Hole 8 – has a lot of trees. There’s usually a headwind. Aim for a low ceiling shot between the trees, or (from the blue tees) you could potentially go OVER all the trees. (They moved all the tees in 2025. Slightly easier now).
.

Hole 9 – is a long narrow side sloped (right to left) fairway with OB left. The wind is usually a tailwind, so go understable and something that doesn’t fade hard. 2nd shot is a bit uphill and the baskets are on top of a hill so stay with an understable disc. The OB line is very close to basket B, making it much harder than A. You might want to take the path to the right of those final trees, to avoid that OB. This hole is probably the hardest to birdie.
.
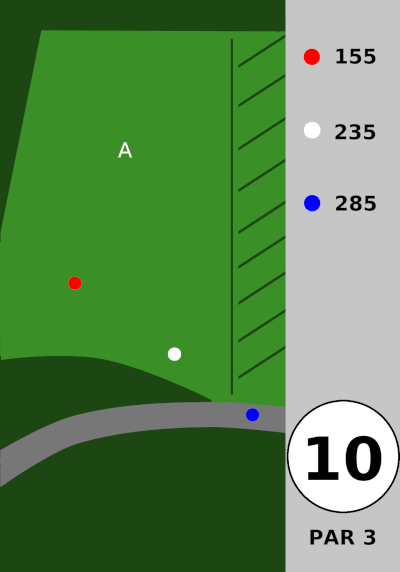
Hole 10 – This seems like it should be very easy, but due to the elevated basket and the wind, it is not. There’s usually a terrible right to left updraft. Try not to over shoot it and glide 50 feet long. Rollaways are a real problem to the right and long. I have seen discs rolling behind the basket roll all the way down to the tall grass 100 ft away.
This basket is very tall. It’s like 7 feet up to the center of the basket. If there’s ever a junior tournament here, I hope they put in a temporary regular height basket.
.

Hole 11 – The baseball field is OB, but you are allowed to throw over the field, as long as you don’t land on it. Once you get in front of the red tees, you will probably want to thrown an overstable driver to curve left. If you can throw over 300 ft, you could possibly eagle it from the red tees. It’s hard to see. Here’s some pictures.

From the white tees it’s 200 ft to clear the tree on the right and 240 ft to the hill. The arrow here will get you to the center of the fairway. You could also land on the hill, by the fence.
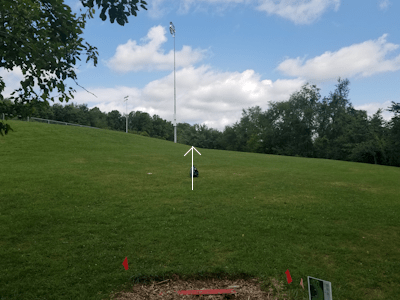
From the red tees, aim just to the right of this light pole.
.
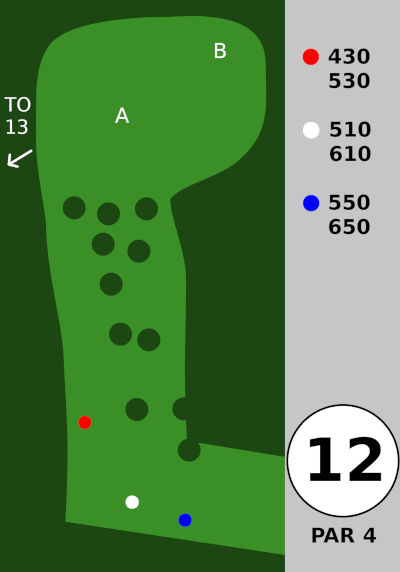
Hole 12 – The first half is thick with trees, and then a wide open fairway near the basket. For the bold, you could consider going OVER those trees (especially from the red tee), just don’t sail too far right or you’ll never find your disc. There’s also a low path through the trees on the far left side, which is what most people will be aiming for. There’s a narrow path on the far right side of the fairway which is much more difficult and closer to danger.
From the end of the trees, it’s 120 ft to the A basket and about 200 ft to the B basket (and maybe longer from the far left side).
.
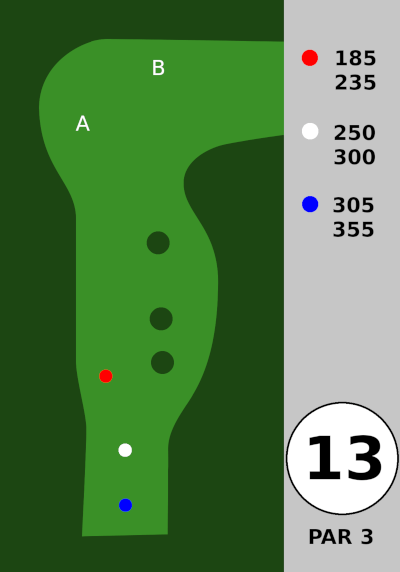
Hole 13 – is a short par 3. Don’t go too far left, or there is a steep downhill. Don’t try to climb down, just walk all the way around back to 12 fairway to get it. Very elevated baskets again makes birdies more difficult, but the surrounding trees help block the wind.
I’m not sure what the protocol is after throwing it too far left down the hill. It’s not marked OB, but play would slow down considerably if you had to walk all the way around and try to throw the disc back up. Maybe you should declare it “abandoned” and rethrow from the tee?
.

Hole 14 – is a steep uphill. Mando tree on the left. There is a little open fairway just passed the mando tree. The blue tees are way back down a path by a small building (headed back to the ball field).

This is the view from the WHITE tee at 14. I usually take the right gap with a high hyzer off the tee.
.

Hole 15 – is downhill, while avoiding that one huge tree. Use an overstable disc and throw far to the right of the basket, and let the natural fade drop it in. If the basket is inside the white circle, play as an island, and everything outside is OB. I believe there is a drop zone marked with a pink flag.
If the basket is at B, only the 17th fairway to the right is OB. Caution, going too far long is bad. It’s a really steep drop off back there.
.

Hole 16 – is a par 3 with a ton of narrow gaps between many trees. OB to the right, and steep downhill to the left. The slope and the bare ground cause discs to skip far left, so aim for a landing spot 10 feet to the right of the basket.
Backtrack to the right to get to the next tee.
.

Hole 17 – is a steep uphill, with OB along the right. From the red tee, try a big hyzer shot to the right of those trees. From the white and blue tees, you could go between the trees with an understable disc.
.

Hole 18 – is one of the hardest holes, and OB left is very easy to find. There is a mando tree, way on the left, but I can’t imagine how you could miss it. From the tee, just try to land in the fairway. Then, you need an overstable disc to curve hard left and down towards the basket. It’s very downhill by the baskets. Rollaways near the basket frequently go all the way down to the parking lot, so maybe try to go long/wide on that 2nd shot and get stuck in the rough near basket B to avoid deadly rollaways.
I’m not sure if the parking lot is OB. Let’s say it is. On other courses, the parking lot is usually OB.
.
I remeasured the distances. Should be more accurate now. Hole 12 (white and blue) was WAY off before.
