Well, bg is a little different than sprites. We can’t read the bytes in the PPU, not easily. So let’s have a map of all the solid blocks in the room. Having each block 16×16 simplifies everything, and you can stuff the entire room into a 240 byte array. X from 0 to 15, Y from 0 to 14. I copied the array to the RAM, in case we want to make the BG destructable. (Which I will demonstrate a little later). Here’s what the array might look like…
const unsigned char c2[]={
0,0,0,0,0,0,0,0,0,0,0,0,0,0,0,0,
0,0,0,0,0,0,0,0,0,0,0,0,0,0,0,0,
0,0,0,0,0,0,0,0,0,0,0,0,0,0,0,0,
0,0,0,0,0,1,0,0,1,0,0,0,0,0,0,0,
0,0,0,0,0,1,0,0,1,0,0,0,0,0,0,0,
0,0,0,0,0,1,0,0,1,0,0,0,0,0,0,0,
0,0,0,0,0,0,0,0,0,0,0,0,0,0,0,0,
0,0,0,1,0,0,0,0,0,0,1,0,0,0,0,0,
0,0,0,0,1,0,0,0,0,1,0,0,0,0,0,0,
0,0,0,0,0,1,1,1,1,0,0,0,0,0,0,0,
0,0,0,0,0,0,0,0,0,0,0,0,0,0,0,0,
0,0,0,0,0,0,0,0,0,0,0,0,0,0,0,0,
0,0,0,0,0,0,0,0,0,0,0,0,0,0,0,0,
0,0,0,0,0,0,0,0,0,0,0,0,0,0,0,0,
0,0,0,0,0,0,0,0,0,0,0,0,0,0,0,0
};
And the 1’s here match the blocks in the game.

To check collision, you just need to mask the low nibbles of X and Y (& 0xf0) and combine them YX… (X >> 4) + (Y & 0xf0). and check that byte in the array. 1 = brick, 0 = nothing.
For sprites, I have been checking 4 points, each corner, and setting L R U D variables if collision, and eject as needed. First I do an X move, check collision points, and eject X if hit. Then I do a Y move, check collision, and eject Y if hit. See bg_collision() below.
This code is simplified, because X and Y moves are fixed at 1 pixel per frame. A little later, I will modify this so we can test variable speeds. 1 pixel per frame is a bit slow, and might be dull gameplay.
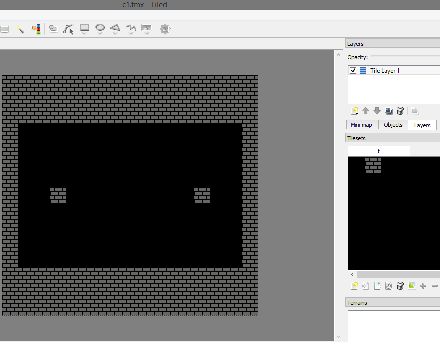
I have been using Tiled to make level data, to use for the collision map. It’s simple to use, and it can export a csv file, which is easy to make into a C array. But, it can’t import NES style .chr file, so I had to make a picture of all the types of blocks. This is very easy, since we have only 2 types, blank and block.
First I make tiles in NES Screen Tool. Then I draw the 2×2 blocks. It looks kind of dumb here, because I only have 2 types, but when have a more detailed game with dozens of blocks, it will start to make more sense. There isn’t a way to export a picture of the nametable, so I just do a screen capture, and crop it in GIMP, save as metatile.png.
Now, import it as a tileset to Tiled. The dimensions are 32×32 per tile, because NES screen tool doubles the pixels. Now design the levels, and export CSV.
It’s a piece of cake to turn a CSV file into a C array, but I made a python 3 script anyway to automate it. CSV2C.py. Then I import the C arrays into my code, and have an array of pointers to each array.
#include “CSV/c1.c”
#include “CSV/c2.c”
#include “CSV/c3.c”
#include “CSV/c4.c”
const unsigned char * const All_Collision_Maps[] = {c1,c2,c3,c4};
Now, I wrote some code to print the array as a block of 2×2 tiles to the screen with a big loop and some vram_put() statements. vram_put() needs the screen to be off. Left to right ppu writes wrap around to the next line. So, you don’t have to change the address to do even the entire screen.
And I have it so that, if you press “Start” it loads a new collision map, and draws it to the screen.
When you (for example) press the right button, it adds 1 to the X position. It then checks 4 points of collision, and if the ones on the right are 1 in the collision map, it ejects (subtract 1 from the X position).
So, test it out. Bump into the walls. Collisions work. Press start and the background changes. Collisions still work, because it loaded a new collision map loaded to the RAM.
Note, I shifted the whole screen down 1 by scroll. Y scroll = ff (-1). Sprites always show up 1 pixel low, so shifting the bg down 1 lines them up.
https://github.com/nesdoug/09_BG_Collide/blob/master/collide.c
https://github.com/nesdoug/09_BG_Collide
The loading code isn’t very good, because it can only draw 1 kind of tile block, and it never changes the attribute table. I’m going to cover a much better loading system (see page on metatiles), a bit later, but first I wanted to talk about scrolling.

This part took me a while to wrap my head around:
“To check collision, you just need to mask the low nibbles of X and Y (& 0xf0) and combine them YX… (X >> 4) + (Y & 0xf0). and check that byte in the array. 1 = brick, 0 = nothing.”
So I thought I would share my notes here for anyone else struggling:
// >> 4 is divide by 16, and these maps are 16 tiles wide, so this puts x into
// map space.
// & 0xf0 (240) is like saying “floor(y / 16) * 16”. The first part in () tells us how
// many ‘rows’ down it is, and since this is a linear array, the *16 then jumps an
// entire row of array entries for each.
// Basically it replaces a more modern approach of:
// int map_x = screen_x / map_cell_size; // map_cell_size = 16 pixels in this case
// int map_y = screen_y / map_cell_size;
// int map_index = map_x + (map_y * map_width_in_cells); // map_width_in_cells is 16 as the map is 16×15
LikeLike
Edit: The first comment line should read:
“and these map tiles are 16 pixels wide” not
“and these maps are 16 tiles wide”
LikeLike
Another part that I got hung up on was when drawing the background, he loops over the row twice, seemingly running the exact same code twice. Here’s my understanding in case it helps anyone else having trouble with this:
Initially I was thinking this would just write the same background tiles to the same location, but what I forgot was that vram_put() also increments the vram address, so each time he writes, he is actually moving that pointer “across the screen”.
It’s important to remember that for each entry in the map array, we need to write 4 tiles to vram (making at 16×16 tile).
This doesn’t happen on a tile by tile basis as you might expect, but instead is done on a row by row basis (with each tile taking up 2 rows and 2 columns).
The first x loop goes through an entire single row of the screen (writing out 16×8 sections of tiles). The second x loop writes the next row of 8×8 tiles (again writing out 16×8 sections. The end result is that for each loop of Y, we have written 2 rows of 8×8 tiles.
LikeLike
To expand on the steps about getting Tiled maps into game:
1) In tiled, select File -> Export As -> Save as Type: CVS
2) Open command prompt in the root directory of this project: C:\…\cc65-snapshot-win32\09_BG_Collide-master> .\CSV\CSV2C.py .\CSV\c1.csv
3) From there run the following command: ” .\CSV\CSV2C.py .\CSV\c1.csv”
Replace c1.csv with the name of any file you export from Tiled.
LikeLike