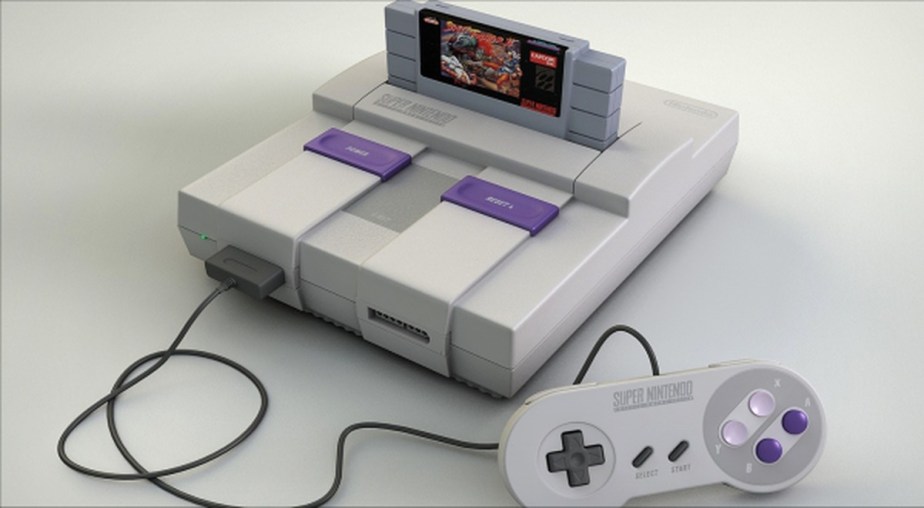
The Super Nintendo first came out in 1991 (1990 in Japan as the Super Famicom). It was one of the best game consoles of all time, with an amazing library of games. It definitely has a special place in my heart. Before we get to programming for it, let’s take a look and see what’s under the hood.
It contains a 65816 clone chip called the Ricoh 5A22 (3.58 MHz), which is a direct descendant of the 6502 chip that powers the original Nintendo. The instruction set is a super-set of the 6502 instruction set, and essentially all the 6502 codes work the same on both chips (with the bugs fixed). The chip has both 8 bit and 16 bit modes, and has a full 24 bit addressing space (0 to 0xFFFFFF).
(borrowed this image from https://copetti.org/projects/consoles/super-nintendo/ )
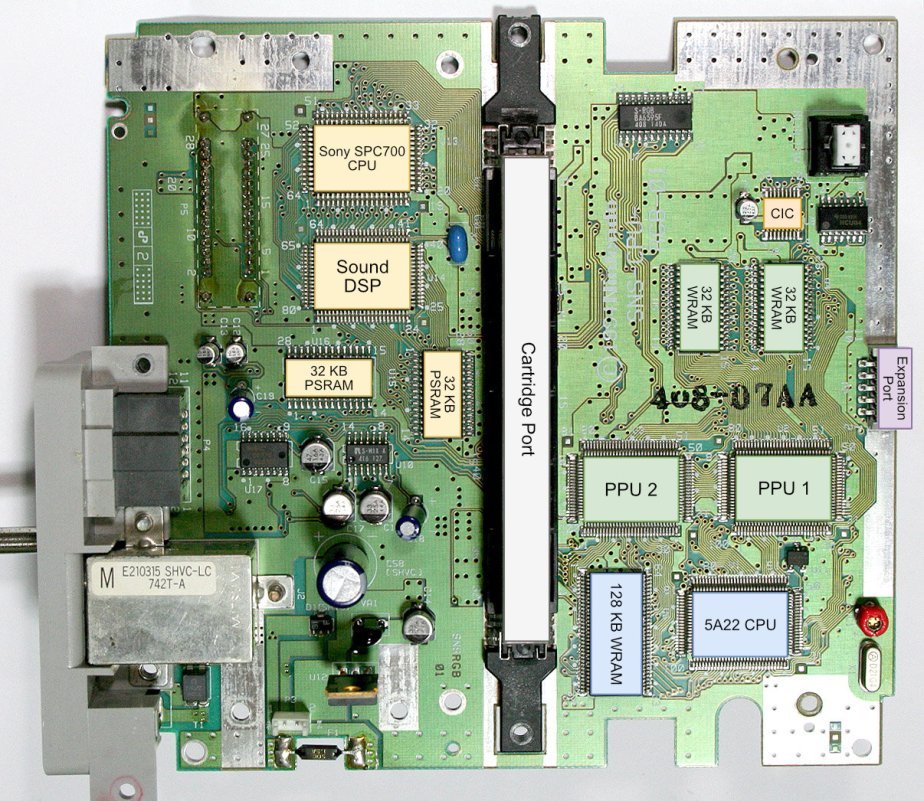
It has 128kB internal WRAM.
This unit has 2 PPU chips. Later models had 1 chip (marked as “1chip”) and are slightly better, but both function the same, other than picture quality. The PPU is what generates the video image. It has its own 64 kB of VRAM (arranged as 32 kB addresses of 16 bits). The VRAM holds our graphics and background maps.
Background tiles can be 8×8 or 16×16. Background maps can be 32×32, 64×32, 32×64, or 64×64 tiles in size (multiplied by the tile size). Giving from 256×256 pixel map (8×8 tiles and 32×32 map) to 1024×1024 pixel map (16×16 tiles and 64×64 map). Scrolling games will typically change the map as you move through the level… to give the appearance of an even larger map.
There is also a memory chip for color palettes (CGRAM) of 512 bytes. Color palettes are 15 bits per color, RBG 0bbbbbgggggrrrrr, so 512 bytes gives us a total of 256 colors. And another RAM chip for sprite attributes (OAM) of 544 bytes, arranged as a low table of 512 and a high table of 32.
Sprites are 4 bytes (and 2 extra bits) each, so 512 byte / 4 gives us 128 sprites displayable at once. Sprites can be various sizes, from 8×8 to 64×64. Typically they would be 8×8 or 16×16.
The CIC is the security chip. Each cartridge will need a matching chip to run.
The cartridge itself could contain battery backed SRAM for saving games. The cartridge can also have co-processors, such as the SuperFx chip.
On the other side of the motherboard are the audio chips. The audio CPU is marked S-SMP. It is a system that runs independently from the SNES CPU. This processor is a Sony SPC700 Audio CPU. It has it’s own 64 kB of RAM where you load the audio program, the song data, and the audio samples.
The audio program will then process the song data and set the 8 channels (DSP, digital signal processor) to play the different audio samples at different rates to generate different tones. The samples are compressed in a format called BRR.
When the SNES is switched on, the main program will have to load everything to the audio ram. This is actually a very slow process, and if you notice that games show a black screen for a few seconds when the game is first run, it is probably due to loading the sound RAM. Once the audio program is loaded, it will run automatically. The audio program can also get signals from the game (for example, to change songs, or to play a sound effect).
Graphics Modes
If you are familiar with the original Nintendo, the Super Nintendo works very similar except that everything is changeable. Backgrounds can have 8×8 or 16×16 tiles, small maps, large maps, 1 layer, 2 layers, 3 layers, 4 layers, all moving independently.
You can rearrange the VRAM any way you want. You can put maps first then BG tiles then sprite tiles. Or, BG tiles first then sprite tiles then BG maps. Or, you can have one giant 256 color BG that fills the entire VRAM and no sprite tiles. Any way you want.
Here’s a quick look at the different background modes.
Mode 0
4 layers of 4 colors per tile.
This mode is not as colorful (per tile). I generally only see it used for screens of text. The main advantages are the extra layer, and the graphics files are half the usual size. This mode is the most like the original Nintendo (or maybe Gameboy Color), and a game ported from there to the Super Nintendo (with no improvements) might use mode 0.
(It’s actually 3 colors plus 1 transparent per tile. Each layer has a unique 8 palettes to choose from. 8 palettes x 3 colors x 4 layers + 1 backdrop color = 97 BG colors for Mode 0)
Mode 1
2 layers of 16 colors per tile.
1 layer of 4 colors per tile.
This is the most used mode. Nearly every game uses mode 1 most of the time. Typically, the first 16 color layer for foreground and other for background. Then the 4 color layer is used for text boxes or HUD / score display.
(8 palettes, both 16 color layers share the same 8 palettes. 15 colors per palette x 8 palettes + 1 backdrop color = 121 BG colors. The 4 color layer has to share palette space with the first palette of the other layers.)
Mode 2
2 layers of 16 color.
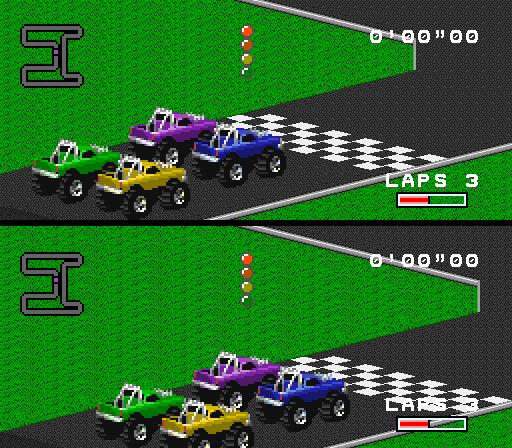
Each tile can be shifted. See Tetris Attack, how the play area scrolls upward. This mode is very rarely used. Yoshi’s Island uses it for 1 level (Touch Fuzzy Get Dizzy).
Mode 3
1 layer of 256 colors per tile.
1 layer of 16 colors per tile.
This mode is very colorful, but the graphics files are twice as big as usual, so games typically only used them (if at all) for title screens. Like this…
Mode 4
1 layer of 256 colors per tile.
1 layer of 4 colors per tile.
Similar to mode 2, tiles can be shifted. Rarely used mode. Bust-A-Move uses Mode 4 for regular gameplay.
Mode 5
1 layer of 16 colors
1 layer of 4 colors
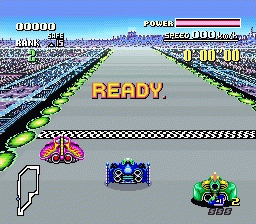
This mode is a high resolution mode. It is rarely used. RPM Racing uses it.
Mode 6
1 layer of 16 color
Also a high resolution mode. Also can shift tiles like mode 2 or 4. I’ve never seen this used outside of demos.
Mode 7
1 layer of 256 colors
This is the mode that really set Super Nintendo apart from other consoles. This mode is one layer that can zoom in and out and rotate the background. This mode is completely different from the other modes and has it’s own special graphics format that is hard to explain. Tiles are always 8×8 pixel and the map is always 128×128 tiles, giving a 1024×1024 pixel map.
Interestingly, mode 7 does not naturally do perspective. It can stretch and rotate only. But, games like F-zero change the stretching parameters line by line to simulate perspective. As the PPU generates the image sent to the TV, it renders each horizontal line, one at a time, and the BG image becomes more and more zoomed in towards the bottom of the screen.
Really, all the modes can change parameters line by line. One fairly common technique is to change the main background color to create a gradient effect. It uses HDMA to do this, which is the only way to send data to the VRAM (or in this case, CGRAM) during the active screen time.

Sprites
For all the modes, the way sprites work is always the same. Sprites are always 16 colors (actually 15 since the 0th color always transparent). Also, sprites have different size modes (8×8, 16×16, 32×32, 64×64), and different priorities (which work like layers). You can flip them horizontally or vertically.
Like the NES, there is a limit of how many sprites can be displayed on each horizontal line, and the calculus for that is a bit complicated. If you split each large sprite into 8×1 slices, you can only fit 32 slices on a horizontal line. The 33rd will be invisible. Generally this isn’t a problem, but you should be aware of it.
All the characters on the screen are sprites. Mario. Koopas. Etc. Because sprites can be large and you can fill the screen with them, and move them around easily, sprites can be used for background elements and be considered as another background layer. Title screens often have the title written in sprites, for example. And, mode 7 games use sprites as a second layer.
Other possibilities
You can change modes and settings mid screen.
You can change scrolling mid screen, and create a shifting sine wave pattern, perhaps for fire or underwater scene.
You can do color transparencies. One layer added to another (or subtracted from another).
You can use “windows” to cut a hole in the screen, or narrow the screen from the sides, or even adjust the windows line by line with HDMA and draw shapes on the screen.
All these effects are more advanced, and we shouldn’t worry too much about that stuff yet.
I plan to write some basic tutorials for getting a very simple game working on the Super Nintendo. But, we need to take it very slowly.
