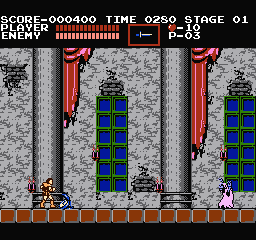
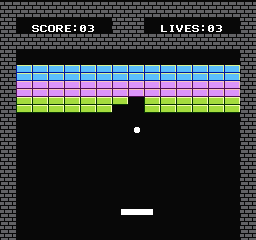
Let’s talk about a game loop. Here’s some sample code for a simplified breakout clone.
Games need an infinite loop. while (1) works.
The first item is ppu_wait_nmi(). This sits and waits till the start of a new frame. 60 per second (50 in Europe), the nmi will trigger. But, if the game logic takes too long, and we’re already past the start of nmi before we get to the ppu_wait_nmi(), then it waits an extra frame, and the game will seem to slow down. That hasn’t happened yet, because our code is so short, but it will later, in the platformer game, so keep the loop short and concise.
Then I read the controllers. Both regular pad_poll(0) and the new presses get_pad_new(0).
Then I draw the scoreboard each frame. I’m using one_vram_buffer() and the vram buffer system so we never have to turn the screen off and on to write to the PPU.
Then the game logic, move the paddle. Move the ball. Check if collision with blocks.
Move paddle…
if(pad1 & PAD_LEFT){
	Paddle.X -= 2;
	if(Paddle.X < PADDLE_MIN) Paddle.X = PADDLE_MIN;
}
if(pad1 & PAD_RIGHT){
	Paddle.X += 2;
	if(Paddle.X > PADDLE_MAX) Paddle.X = PADDLE_MAX;
}
Move ball, if active…
if(ball_direction == GOING_UP){
	Ball.Y -= 3;
	if(Ball.Y < MAX_UP){
		ball_direction = GOING_DOWN;
	}
}
else { // going down
	Ball.Y += 3;
	if(Ball.Y > MAX_DOWN){
		--lives01;
		ball_state = BALL_OFF;
	}
}
Then draw the sprites, first by clearing the old, then redrawing all the active sprite objects.
If a block is hit with the ball, hit_block(), it deletes it from the collision map, c_map[temp1] = 0. Then write some blank tiles (zero) to the background at that same position. get_ppu_addr() will find the address of a specific x and y. We just need to push 2 zero tiles at that location. I use the vram buffer system (using one_vram_buffer() twice) to automatically send it to the PPU during the next v-blank.
Normally, I would have different “game_states”, like for title, game, pause, end. I am using different “ball_states” to handle the ball off screen wait “BALL_OFF”, the ball ready to go “BALL_STUCK” (stuck on the paddle), and ball moving “BALL_ACTIVE”.
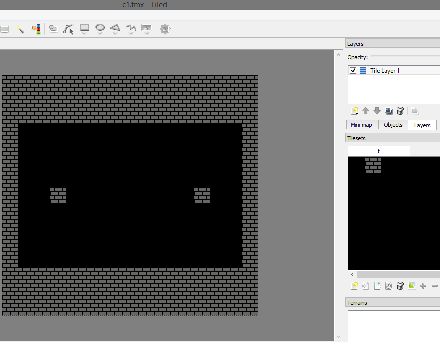
I started out by making the background in NES Screen Tool. The breakable tiles are defined an array, c1.csv. I did not end up using Tiled for it, because it was easy to type. If this was modified, it would change the layout of the breakable tiles.
const unsigned char c1[]={
0,0,0,0,0,0,0,0,0,0,0,0,0,0,0,0,
0,0,0,0,0,0,0,0,0,0,0,0,0,0,0,0,
0,1,1,1,1,1,1,1,1,1,1,1,1,1,1,0,
0,1,1,1,1,1,1,1,1,1,1,1,1,1,1,0,
0,1,1,1,1,1,1,1,1,1,1,1,1,1,1,0,
0,1,1,1,1,1,1,1,1,1,1,1,1,1,1,0,
0,1,1,1,1,1,1,1,1,1,1,1,1,1,1,0,
0,1,1,1,1,1,1,1,1,1,1,1,1,1,1,0,

0,0,0,0,0,0,0,0,0,0,0,0,0,0,0,0,
0,0,0,0,0,0,0,0,0,0,0,0,0,0,0,0,
0,0,0,0,0,0,0,0,0,0,0,0,0,0,0,0,
0,0,0,0,0,0,0,0,0,0,0,0,0,0,0,0,
0,0,0,0,0,0,0,0,0,0,0,0,0,0,0,0,
0,0,0,0,0,0,0,0,0,0,0,0,0,0,0,0,
0,0,0,0,0,0,0,0,0,0,0,0,0,0,0,0,
0,0,0,0,0,0,0,0,0,0,0,0,0,0,0,0
};
The gray bricks were drawn in NES Screen Tool, and exported as a compressed RLE file. vram_unrle(breaky_bg2) will decompress it to our nametable (remember, this function needs to be used when the screen is off).

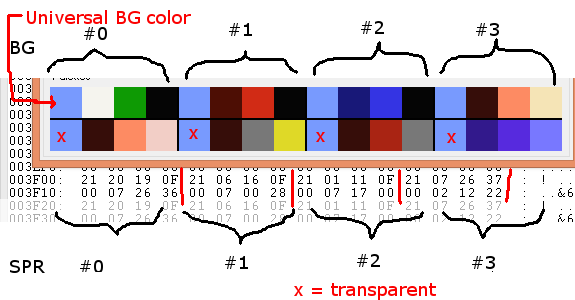
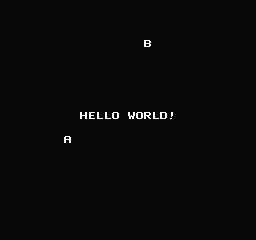
I changed the attribute tables beforehand, in NES Screen Tool, and save the background. That’s what gives the tiles their color, they are different palettes. But they all use the same tiles. Here is the attribute checker view (press “A”).

And it updates the scoreboard every frame. Notice, I’m keeping each digit of the score as a separate variable (value assumed to be 0-9). score10 is tens digit and score01 is ones digit. Division and modulus are very slow operations on the NES, due to the lack of built in math in the 6502 processor, so keeping each digit separate speeds up the code.
https://github.com/nesdoug/12_Break
Feel free to turn this into a full game. Sideways movement would complicate the logic a bit more. I wanted to keep the example code as simple as possible. Well, line 183 is a bit complicated (sorry about that).
temp1 = (temp_x>>4) + (((temp_y-0x30) << 1) & 0xf0);
but what it does is convert the x and y position of the ball to a position on the array of blocks to break. >>4 is like divide 16… which gets a value 0-15 from the x. The screen Y is misaligned to the array by 0x30. The tiles are actually 8 pixels high (instead of 16), so I had to modify my usual background collision code with a << 1 to get the y value to line up to the array.