This is a lesson on using SNESGSS to make SNES music.
Before you read this… I have made improvements to SNESGSS, the newest version has a Q at the end, and it has a different music.asm file. See this link for more info.
.
NOTE – If SNESGSS editor stops playing the music correctly (silences some or all the notes), the issue is that there is too many things loaded to fit in the ARAM. This could happen unexpectedly, because adding to the song editor might overflow the available RAM, without warning. Click over to INFO and it will probably say there is no memory left. You will have to shorten the song or remove unused samples.
.
SNES programming tutorial. Example 10.
https://github.com/nesdoug/SNES_10
Here’s an interesting video on the SPC700 and SNES audio.
Today, we are going to talk about SNES music. The APU (Sony SPC700) is a different chip entirely, and has its own 64k of RAM. At the beginning of our program, we need to load the APU with our SPC file. It is an audio program that runs automatically.
The APU is connected to an 8 channel DSP (digital sound processor). The song will direct the DSP to play different sound samples at different rates to make tones. If you are familiar with MIDI, it is similar. The samples can be looped or not. The samples are compressed into a native compression called BRR (bit rate reduction).
BRR samples are very large, and you will probably be only able to fit 10-15 samples. Each will have to be edited (perhaps with Audacity) to less than a second each, and at a reduced sample rate. We are going to work with SNESGSS (written by Shiru).
I originally found it here (you might want to look here to get the sample intruments), but don’t use this .exe because it has a bug.
https://github.com/nathancassano/snesgss
I patched out the bug, and also added echo functions. You can get that version here…
https://github.com/nesdoug/SNES_00/tree/master/MUSIC
and also grab the music.asm file. You will need it.
.
SNESGSS prefers to have 16-bit MONO WAV samples at sample rate 32000 or 16000. I have tried 8000, but usually the sound quality is too bad at 8000. 8000 might be ok for a bass sample.
There seems to be a bug in Audacity, when you resample to another rate (Tracks/Resample), it doesn’t actually change the project sample rate, nor will it save the project at that sample rate. What you need to do is Open the WAV file in Audacity, Select All and COPY it. Then Open a NEW PROJECT, and change the project’s sample rate (at the bottom left) to 16000. Then PASTE it. Now it will save at the correct sample rate.
Recording at the desired rate has no problems. 16000 seems to be a nice sweet spot on audio quality and file size.
SNESGSS also suggests tuning the samples to B +21 cents. I did not. I left all my samples at C. They are not in tune with the samples provided with SNESGSS, which I did not use. I think those are tuned to B +21. The reason behind the unusual tuning is to make it easier to make looped samples without clicks. BRR format is forced to be blocks of 16 samples, so a multiple of 16 samples (such as 256 samples per wave cycle) at a sample rate of 32000 (or 16000) samples per second works out to B +21.
But, feel free to use whatever tuning is easiest for you.
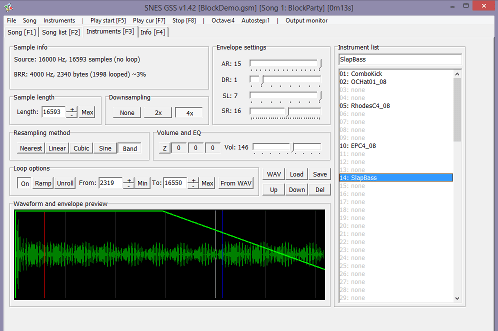
Hit the WAV button near the middle of the screen to load your samples. Setting the envelopes similar to this sounds good to me (15, 1, 7, 16). If you managed to loop the sample perfectly, you may prefer to leave the last envelope setting (SR) at 0, for a tone that can continue infinitely.
You can press the 2x or 4x buttons if you run out of room for files, to downsample by half.
To loop, click the “On” button and type in the loop start (FROM) and loop end (TO) numbers. Note – BRR sample length needs to be a multiple of 16, and the loop start and end points need to be a multiple of 16. SNESGSS doesn’t tell you that… you will probably have to use a calculator to calculate a multiple of 16 and type exact numbers in.
I wouldn’t mess with the volume or EQ settings. That is something you should have done in Audacity while editing. Just keep in mind that the SNES tends to weaken the upper range and make bright sounds feel dull. You might have to do a treble boost for the lead instruments.
This tracker will convert our samples to BRR, but not until your final export. Unfortunately, you can’t import BRR samples to it from other sources. And you can’t export BRR samples, although you could export an SPC and use spc_decoder.exe from BRRtools to extract the BRR samples from the SPC.
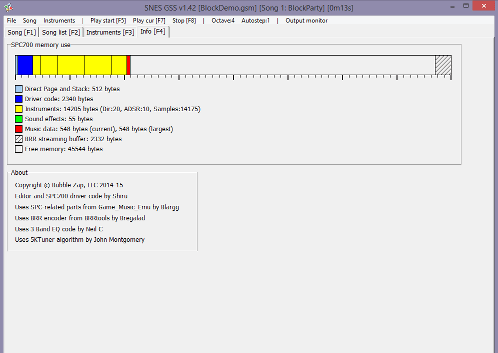
Here you can check the size of all the files. Obviously, you can’t have a bigger SPC file than 64k, the size of the APU RAM.
I should note, that we only load 1 song in the APU RAM at a time. Staring a new song will load a new song (over the previous song), so that only one song is loaded at any time. That should give you a little flexibility on overall size.
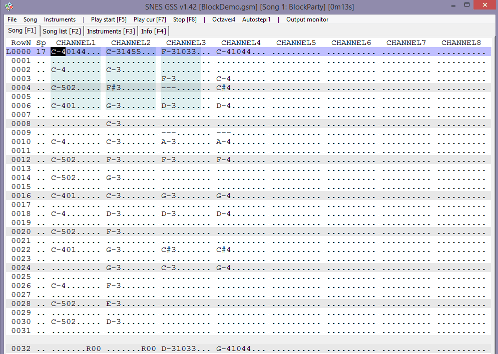
Here is the main editor. You type Z-M keys for lower octave, Q-P keys for upper octave. You can change the octave by pressing the octave button. So, this is a standard tracker, it goes downward as the song plays.
You can toggle channels on and off by clicking on the word “channel 1”, etc. You can divide things into sections. Press the spacebar to mark the end of a section. Then you can repeat the previous section with an R00 command.
The order of things is Note, Instrument, Volume 0-99, and Special effects. The SP column is for song speed (smaller is faster). You can scroll up and down with PgUp and PgDn keys, and also Home and End goes to the next section.
CTRL+End marks the end of the song, and CTRL+Home marks the loop back point.
You can import Famitracker and MIDI files (notes only), but I haven’t tried.

On this page, you can mark a song as a “Sound effect”.
Once the songs are done, you File/Export. And that will produce several files.
spc700.bin is our main SPC file. It holds the program and the samples and the sound effects data.
music_1.bin (one file per song) is the song data.
sounds.asm and sounds.h we don’t need. Don’t include them. This was for a different assembler / C compiler. You might want to look at it to find the value of each sound effect.
.define SFX_DING 0
…tells us that the DING sound effect is called with the value zero.
.
https://github.com/nesdoug/SNES_10/tree/master/MUSIC
I changed the asm code in mid 2021, make sure you have the latest music.asm so it can handle SPC files larger than 32k. Here’s how we can include the file accross 2 different LoROM banks.
(ca65/ld65 linker specific commands).
If the SPC file is larger than 32k, you can add arguments to the .incbin command to split the file.
.incbin “MUSIC/spc700.bin”, 0, 32768
and
.incbin “MUSIC/spc700.bin”, 32768
The top one says copy 32768 bytes starting at 0. The second one (with 1 number) says to include from 32768 to the end of the file. The newest version of SPC_Init can copy the entire thing to the SPC RAM (even across multiple banks).
.
CODE
Let’s go over the music.asm file, which you should have grabbed from one of my example folders. I had to modify the original code to work with ca65.
SPC_Init – should be called at the start of the game, with interrupts off (NMI, IRQ, controllers). With AXY16 you load A with the address of the of SPC file (spc700.bin) and X with the bank of the SPC file, and JSL to SPC_Init.
By the way, running this function takes a long time. It could take 2 seconds or more.
SPC_Load_Data is an internal function, for loading data to the APU RAM.
SPC_Play_Song loads a song (data) to the APU RAM and then starts playing it. This also should be done with interrupts off. Note that this system only loads one song at a time to the APU RAM. If you have a song in and then load another song, it overwrites the first song.
With AXY16 load A with the address of the song data (like music_1.bin) and load X with the bank of the song, then JSL to SPC_Play_Song. Once it’s done, it will begin playing the song automatically.
SPC_Command_ASM is an internal function. It’s what sends signals to the APU.
SPC_Stereo is to set mono (default) or stereo audio. Load A (8 or 16) with 0 for mono, 1 for stereo. Audio channels can be panned left or right.
SPC_Global_Volume is to set the max volume, 0-127. It can also be used to fade in or fade out. One of the variables is called speed, and it is the step value, to go from previous volume to the new volume. 255 is the default speed, which is instant change (any value >= 127 would be instant). Speed of 7 seems nice for a fade, and will take 2 seconds to transition. Don’t give it a speed of zero, the volume won’t change.
AXY8 or AXY16, load A with the speed of volume change (1-255), and load X with the new volume (0-127), then JSL SPC_Global_Volume.
The SNES has a master volume variable, which affects all channels. That’s what this sets, and doesn’t affect individual channel volumes.
SPC_Channel_Volume sets the max volume for an individual audio channel. AXY8 or AXY16, load A with the channels and load X with the volume (0-127) and the JSL to SPC_Channel_Volume. I’m not sure what circumstances I would use this. Maybe to silence or dim a lead instrument, for a change in dramatic tone.
Note, the channel here is a bitfield, with each bit representing a channel.
0000 0001 = channel 1
0000 0010 = channel 2
0000 0100 = channel 3
0000 1000 = channel 4
0001 0000 = channel 5
0010 0000 = channel 6
0100 0000 = channel 7
1000 0000 = channel 8
For example, LDA #$42 (0100 0010) would effect channels 2 and 7.
Music_Stop stops the song. JSL here.
Music_Pause will pause and unpause the song (and not effect the sound effects that are playing). Load A (8 or 16) with 1 for pause and 0 for unpause, then JSL here.
Sound_Stop_All stops all sounds, song and sound effects. JSL here.
SFX_Play_Center plays a sound effect, pan center. With AXY8 or AXY16, load A with the # of the sound effect, load X with the max volume of the sound effect (0-127), and load Y with the channel (0-7), the sound effect should play. Channel needs to be higher than the max channel for the song playing. Therefore, you must reserve some empty channels in the song, if you want sound effects to play with it.
SFX_Play_Left, is the same, but pan left.
SFX_Play_Right, is the same, but pan right.
SFX_Play is an internal function that the 3 above functions call.
Streaming has been removed. See the 13th SNES example page for echo functions.
EXAMPLE CODE
;copy the music code and samples to the Audio RAM
AXY16
lda #.loword(music_code)
ldx #^music_code
jsl SPC_Init

;turn on stereo sound
AXY16
lda #$0001
jsl SPC_Stereo
…and at the bottom we have
.segment "RODATA6"
music_code:
.incbin "MUSIC/spc700.bin"
music_code_end:
.
Then I load the song, and start it playing (before I turn on NMI interrupts).
AXY16
lda #.loword(song1)
ldx #^song1
jsl SPC_Play_Song
By the way “.loword()” gets a 16 bit value from a 24 bit label. ^ gets the bank of a label.
.
Now I just need to set up a trigger for the sound effect. We already have that yellow block triggering the screen to go dark, so I just snuck in a little more code there. I didn’t want it re-starting the same sound effect over and over and over each frame, so I added a variable to remember the LAST FRAME, if we were over the yellow block, and skip a trigger in that case.
cmp bright_var2 ;compare to last frame
beq Past_Yellow ;skip if last frame is true

AXY8
lda #0 ;= ding
ldx #127 ;= volume
ldy #6 ; = channel
jsl SFX_Play_Center
Our song plays from channels 1-4 (ie. 0-3), and our sound effect uses 2 channels, so we could have set this to 4,5, or 6. This function is zero based index, ie. values 0-7. So 6 means it will play on channels 7 and 8. Sorry for flip flopping between zero based and one based numbers. Hope this isn’t too confusing.
However, if we loaded X with 0,1,2, or 3. It would not play. If we loaded X with 7, only the first channel of the sound effect would play.
Here’s a picture of the demo again. It looks the same as the previous example.

.
https://wiki.superfamicom.org/spc700-reference
https://wiki.superfamicom.org/bit-rate-reduction-(brr)
.
There are other programs for getting music onto a Super Nintendo.
You could use SNESMOD with OpenMPT. I still need to research this more before I can recommend it. I have heard that a version of SNESMOD by AugustusBlackheart and KungFuFurby is good. Sorry I can’t be more informative here.
Another program, BRRTools, can convert audio files to BRR. I haven’t used it, but the SNESGSS tool uses the same code. It says you can turn BRR samples into WAV and WAV into BRR. This could be a way to use existing BRR samples in our SNESGSS projects (by using this tool to convert them into WAV files first).
https://www.smwcentral.net/?p=section&a=details&id=17670
.
Update 2023. After some test, the SNES goes through the decay phase of ADSR much faster than I expected. (much faster than the SNESGSS envelope graph shows). With SL=7, it skips it entirely. SL=6 is still nearly instant. See the results of my own testing.
.

Hi, so I got the music to work, but I changed both the music and SFX, but the SFX doesn’t play.
LikeLike
Make sure you mark each SFX with a check in the song list. Also, you need to have unused channels in the song that is playing.
LikeLike
Did these, didn’t work, go to the NESdev forums for my post.
LikeLike