Programming the SNES in assembly, using the ca65 assembler.
Assembly Language Basics
Assembly is a low level programming language. We have to think at the basic level that the CPU processes the binary code. Let’s review binary, and hexadecimal numbers.
Number Systems
Binary. Under the hood, all computers process binary numbers. A series of 1s and 0s. In the binary system, each column is 2x the value of the number to the right.
0001 = 1
0010 = 2
0100 = 4
1000 = 8
You then add all the 1’s up
0011 = 2+1 = 3
0101 = 4+1 = 5
0111 = 4+2+1 = 7
1111 = 8+4+2+1 = 15
Each of these digits is called a bit. Typically, there are 8 bits in a byte. So you can have numbers from
0000 0000 = 0
to
1111 1111 = 255
Since it is difficult to read binary, we will use hexadecimal instead. Hexadecimal is a base 16 numbering system. Every digit is 16x the number to the right. We use the normal numbers from 0-9 and then letters A-F for the values 10,11,12,13,14,15. In many assembly languages, we use $ to indicate hex numbers.
$0 = 0
$1 = 1
$2 = 2
$3 = 3
$4 = 4
$5 = 5
$6 = 6
$7 = 7
$8 = 8
$9 = 9
$A = 10
$B = 11
$C = 12
$D = 13
$E = 14
$F = 15
$F is the same as binary 1111.
The next column of numbers is multiples of 16.
$00 = 16*0 = 0 _____ $80 = 16*8 = 128
$10 = 16*1 = 16 _____ $90 = 16*9 = 144
$20 = 16*2 = 32 ____ $A0 = 16*10 = 160
$30 = 16*3 = 48 ____ $B0 = 16*11 = 176
$40 = 16*4 = 64 ____ $C0 = 16*12 = 192
$50 = 16*5 = 80 ____ $D0 = 16*13 = 208
$60 = 16*6 = 96 ____ $E0 = 16*14 = 224
$70 = 16*7 = 112 ____ $F0 = 16*15 = 240
$F0 is the same as binary 1111 0000.
add that to $0F (0000 1111) to get
$FF = 1111 1111
So you see, you can represent 8 bit binary numbers with 2 hex digits. From $00 to $FF (0 – 255).
To get the assembler to output the value 100 you could write…
.byte 100
or
.byte $64
.
16 bit numbers
Typically (on retro systems) you use 16 bit numbers for memory addresses. Memory addresses are locations where pieces of information can be stored and read later. So, you could write a byte of data to address $1000, and later read from $1000 to get that data.
The registers on the SNES can be set to either 8 bit or 16 bit modes. 16 bit mode means it can move information 16 bits at a time, and process the information 16 bits at a time. 16 bit registers means that it will read a byte from an address, and another from the address+1. Same with writing 16 bits. It will write (low order byte) to the address and (high order byte) to address+1.
In binary, a 16 bit value can go from
0000 0000 0000 0000 = 0
to
1111 1111 1111 1111 = 65535
In hex values, that’s $0000 to $FFFF.
Let’s say we have the value $1234. The 12 is the most significant byte (MSB), and the 34 is the least significant byte (LSB). To calculate it’s value by hand we can multiply each column by multiples of 16.
$1234
4 x 1 = 4
3 x 16 = 48
2 x 256 = 512
1 x 4096 = 4096
4096 + 512 + 48 + 4 = 4660
To output a 16 bit value $ABCD, you could write
.word $ABCD
(outputs $cd then $ab, little endian style)
Don’t forget the $.
We can also get the upper byte or lower byte of a 16 bit value using the < and > symbols before the value.
Let’s say label List2 is at address $1234
.byte >List2
will output a $12 (the MSB)
.byte <List2
will output a $34 (the LSB).
.
24 bit numbers
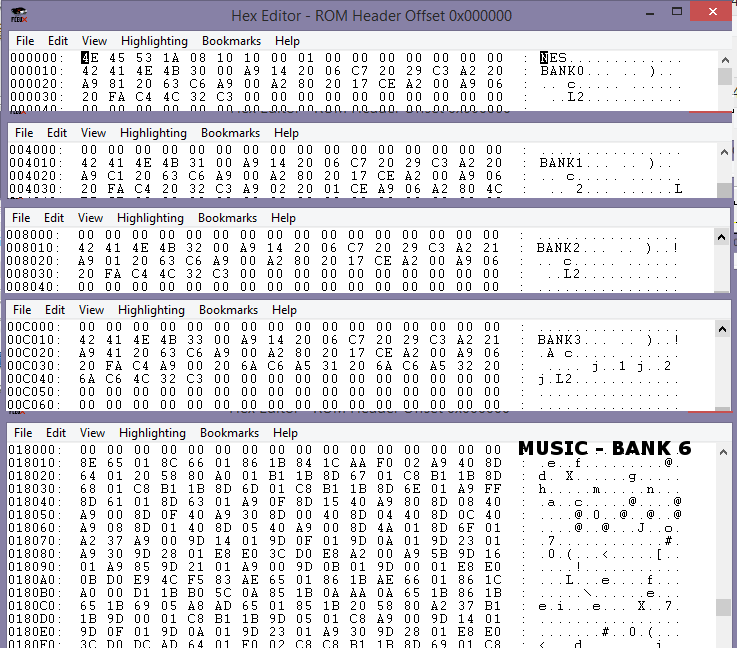
We can now access addresses beyond $ffff. There is a byte above that called the “bank byte”. Using long 24 bit addressing modes or changing the data bank register, we can access values in that bank using regular 16 bit addressing. Here is an example of a 24 bit operation.
LDA f:$7F0000
will read a byte from address $0000 of the $7F bank (part of the WRAM).
In ca65, the f: is to force 24 bit values from the symbol / label. The assembler will calculate the correct values. (to force 16 bit you use a: and to force 8 bit you use z:)
JML $018000
will jump to address $8000 in bank $01.
To output a 24 bit value
.faraddr $123456
(outputs $56…$34…$12)
Or you could do this, to output a byte at a time.
.byte ^$123456
(outputs $12)
.byte >$123456
(outputs $34)
.byte <$123456
(outputs $56)
But we don’t want to write our program entirely using byte statements. That would be crazy. We will use assembly language, and the assembler will convert our three letter mnemonics into bytes for us.
LDA #$12
(load the A register with the value $12)
will be converted by the assembler into this machine code that the 65816 CPU can execute…
$A9 $12
.
65816 CPU Details
There are 3 registers to work with
A (the accumulator) for most calculations and purposes
X and Y (index registers) for accessing arrays and counting loops.
A,X, and Y can be set to either 8 bit or 16 bit. The accumulator is sometimes called C when it is in 16 bit mode. Setting the Accumulator to 8 bit does not destroy the upper byte, you can access it with XBA (swap high and low bytes). However, setting the Index registers to 8 bit will delete the upper bytes of X and Y.
There is a 16-bit stack pointer (SP or S) for the hardware stack. If you call a function (subroutine) it will store the return address on the stack, and when the function ends, it will pop the return address back to continue the main program. The stack always exists on bank zero (00). The stack grows downward, as things are added to it.
Processor Status Flags (P), are used to determine if a value is negative, zero, greater/lesser/equal to, etc. Used to control the flow of the program, like if/then statements. Also the register size (8 bit or 16 bit) are set/reset as status flags. *(see below)
There is a 16-bit direct page (DP) register, which is like the zero page on the 6502 system, except that it is now movable. Typically, people leave it set to $0000 so that it works the same as the 6502. Zero page is a way to reduce ROM size, by only using 1 byte to refer to an address. The DP always exists on bank zero (00).
The Program Bank Register (PBR or K) is the bank byte (highest byte) of the 24 bit address of where the program is running. Together, with the program counter (PC) the CPU will execute the program at this location. The PBR does NOT increment when the PC overflows from FFFF to 0000, so you can’t have code that flows from one bank to another. You can’t directly set the PBR, but jumping long will change it, and you can push it to the stack to be used by the…
Data Bank Register (DBR or B) is the bank byte (highest byte) of the 24 bit address of where absolute addressing (16 bit) reads and writes. Usually you want to set it to the same as where your program is running. You do it with this…
PHK (push program bank to stack)
PLB (pull from stack to data bank)
But you can also set it to another bank, to use absolute addressing to access that bank’s addresses.
There is also a hidden switch to change the processor from Native Mode (all 65816 functions) to Emulation Mode (compatibility for legacy 6502 software, with direct page fixed to $0000-00ff, stack fixed to $0100-01ff, registers fixed to 8 bit only). The CPU powers on in Emulation Mode, so you will usually see
CLC (clear the carry flag)
XCE (transfer carry flag to CPU mode)
near the start, to put it in Native Mode. That’s what we want, native mode.
.
Status Flags
NVMXDIZC
– – – B – – – – (emulation mode only)
N negative flag, set if an operation sets the highest bit of a register
V overflow flag, for signed math operations
M Accumulator size, set for 8-bit, zero for 16-bit
X Index register size, set for 8-bit, zero for 16-bit
D decimal flag, for decimal (instead of hexadecimal) math
I IRQ disable flag, set to block IRQ interrupts
Z zero flag, set if an operation resets a register to zero
. . . . or if a comparison is equal
C carry flag, for addition/subtraction overflow
B break flag, if software break BRK used.
.
Where does the program start? It always boots in bank zero, in emulation mode, and pulls an address (vector) off the Emulation Mode Reset Vector located at $00FFFC and $00FFFD, then jumps to that address (always jumping to bank zero). Your program should set it to Native Mode, after which these are the important vectors.
IRQ $00FFEE-00FFEF (interrupt vector)
NMI $00FFEA-00FFEB (non-maskable interrupt vector)
If an interrupt happens, it will jump to the address located here (always jumping to bank zero).
There is no Reset Vector in Native Mode. Hitting reset will automatically put it back into Emulation Mode, and it will use that Reset Vector.
But more on those later.
I highly recommend you learn more about 6502 assembly before continuing. Here are some links that are helpful.
http://www.6502.org/tutorials/6502opcodes.html
https://skilldrick.github.io/easy6502/
https://archive.org/details/6502_Assembly_Language_Programming_by_Lance_Leventhal/mode/1up
and 65816 assembly reference here.
https://wiki.superfamicom.org/65816-reference
and for the very bold, the really really big detailed book on the subject. You might want to download it just for reference.